DIY Hanging Wall Banner {Tutorial}
March 24, 2020
Hi everyone! I hope y'all are staying strong and staying in during this critical time. I've been working from home for the past week and spending a lot of time indoors. Now that I'm at home more, I'm able to catch up on my pregnancy journal, set up the nursery and finish up all my DIY projects for #BabySue.
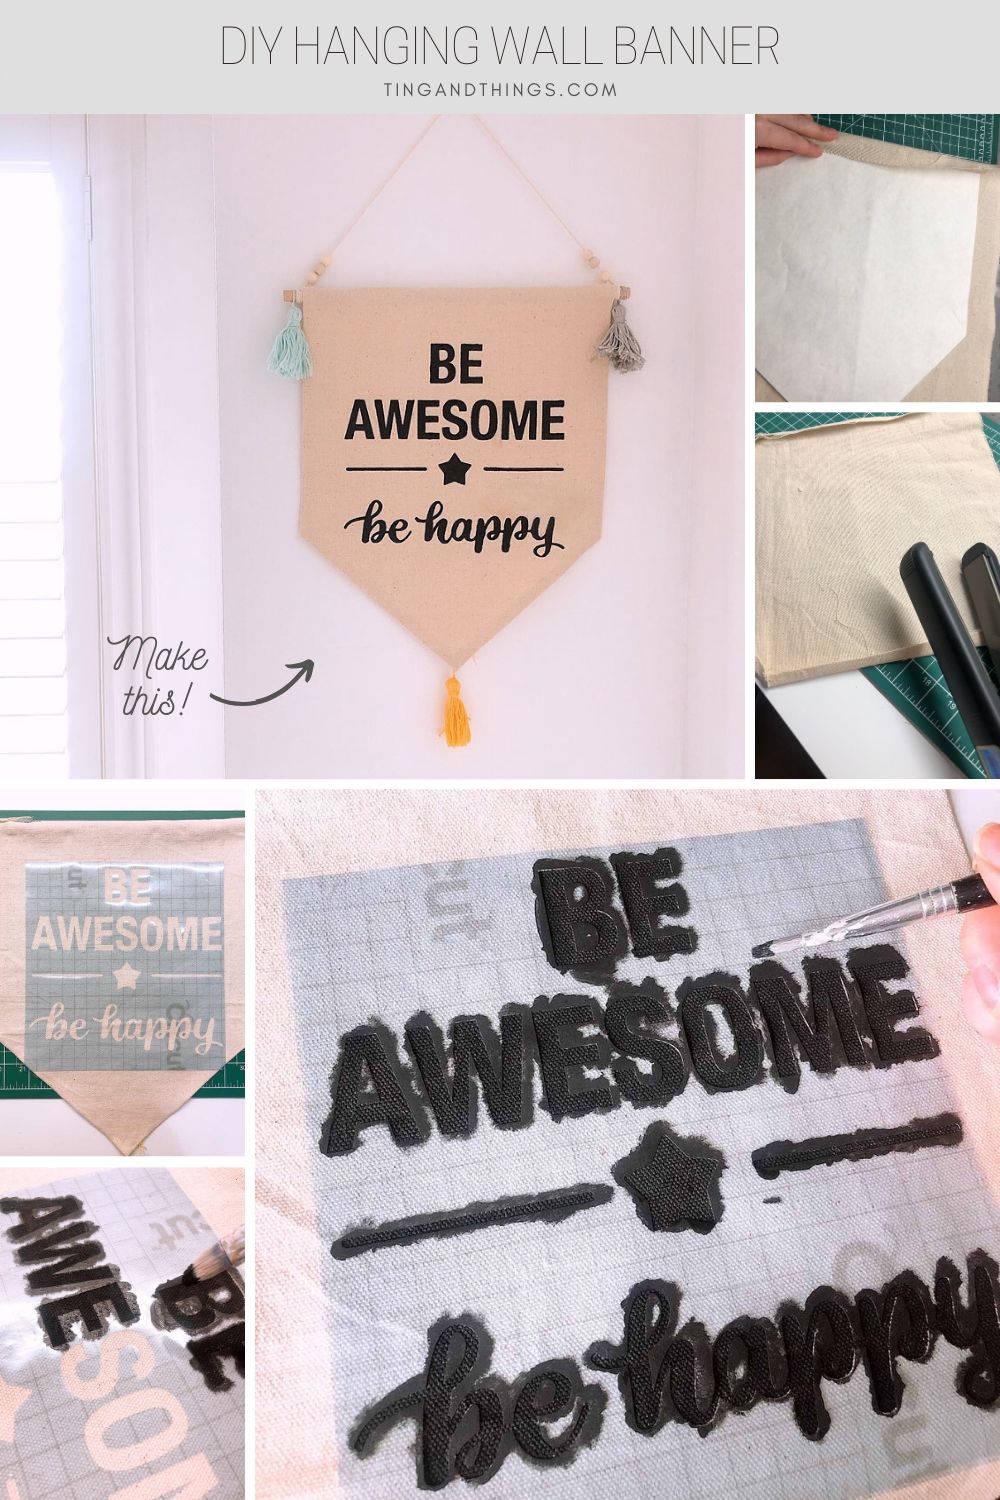
If you're finding it hard isolating away from your family and friends, I hope today's little tutorial can give you a boost of encouragement and positivity. This hanging wall banner is my aspiration for my little boy. I hope he can always stay awesome and happy even through tough times.
How to Make a Hanging Wall Banner
For this tutorial, you'll need:
- A piece of blank canvas
- Scissors
- Glue Gun
- A hair straightener or iron (optional)
- Cricut or cutting machine (optional)
- Stencil vinyl (optional)
- Wooden dowel
- Wooden beads
- Cotton rope
- Embroidery threads
- Black fabric or acrylic paint
- Paintbrush
- My template
Download the hanging wall banner template here
Instructions:
- With a pencil, trace the banner shape onto the canvas with my template and cut it out with scissors. The final size of my canvas after hemming is 11" W x 13" H. You can scale it down to fit a letter-sized paper. Remember to leave 0.25-0.5" for hemming when you trace it on the canvas.
- Fold the hem to the back and iron them down so that you have a nice clean edge. I like to use the hair straightener to do this as it is easier to iron the edge and follow along with the shape. You can also use an iron for this. Glue the hems in place.
- Cut the stencil using your Cricut or cutting machine. If you don't have a cutting machine, simply cut out the words with scissors on a piece of cardstock.
- Tape the stencil onto the canvas and dap the paintbrush with black paint. Carefully dap onto the stencil. Do not brush over, it might bleed underneath the stencil.
- While you wait for the paint to dry, use embroidery threads and make some decorative tassels.
- Fold the top edge of the canvas and wrap around a piece of wooden dowel. Glue it in place.
- Take a piece of cotton rope and add some wooden beads. Wrap around the cotton rope to both ends of the wooden dowel and tie with a knot to secure.
- Glue your tassels onto each corner of the canvas banner.
- Carefully lift up the stencil from the canvas.
And you're done!


I hung this banner up in our nursery room. Hope you like this tutorial!
Check out my digital shop here.
Check out my digital shop here.

![About [span]me[/span]](https://blogger.googleusercontent.com/img/b/R29vZ2xl/AVvXsEg51YZA3uff_lGfAm2WPvaPtznUF0gsieSuVaBa_d4ueEQHmGAHJoO-6IjG2QhrHsB6TFxtBe7Kp7pgPhQ9JxDPFeWf9zlhWBpmioDCq_cgwCmfvXsb3Q935VBe0Bg1yrOJFakkvZK6XQ/s1600/profile7.png)


![About [span]me[/span]](https://blogger.googleusercontent.com/img/b/R29vZ2xl/AVvXsEi0M_3kH8dItlAXTuIsv2fy6Vh66DmueOkq-Xb31dyGKOzuemaVtbrM_2rVWoIm3NFdwlpPEnezCBHeO6vHRn-aPne1M7U9EI4PUTUT6f0IyYR43irzt8-u23HGLtfqpBdheA-g6LhyQA/s608-Ic42/profile5.png)

19 comments
Really cute project! I might give it a try :)
ReplyDeleteInteresting project
ReplyDeleteReally cute project. Now that I am staying a lot at home I’ll definitely try and do it myself.
ReplyDeleteThat looks amazing! And definitely simple enough for me to do! Thank you!
ReplyDeleteThis is really cute! Thanks for sharing this great idea
ReplyDeletethis is such a cute project, it'll look good in my girls' room. i'll have to try it out
ReplyDeleteI love these. I am so terrible at DIY but I think I might be able to make these wall banners.
ReplyDeleteI've been wanting to try out my new cricut! This will be a great project to start with.
ReplyDeleteWow, this looks amazing and perfect for any place in the house or office!
ReplyDeleteGreat idea and your steps are so easy to follow :)
ReplyDeleteThat wall hanging is so cool. I may give it a go, considering we are all at home now so why not.
ReplyDeleteI love all your craft ideas. You are very creative. Full of imagination. I 😉😊
ReplyDeleteSuch a creative idea when you're at home!
ReplyDeleteThat's a cool DIY, I am gonna try this.
ReplyDeleteThis is super cute, and I think I have all of the supplies. Going to give this a try this weekend. Thank you! :)
ReplyDeleteThat is an awesome wall banner. We all need that quote right about now!
ReplyDeleteI have to try this especially now that I have so much time
ReplyDeleteOh this is really cute. It would be a great little project for me and the kids to do while we are on lock down right now! thanks for sharing.
ReplyDeleteThis Diy wall hanging banner is so cute. My niece would love this to her room
ReplyDeleteI'd love to hear your thoughts and comments! Come back soon :)